
Hi there! When I saw this card, I knew I had to CASE it! lol. Who can resist such a cute looking caterpillar? I changed several things though. I did not use a slider card. Instead I used a base cardstock of 4" x 12" and scored it at 4" and 8" so that when folded, it is a 4"x4" card. I did not have a 12" x 12" Whisper White cardstock so I settled with the retired Sahara Sand color. I stamped the "grass" image from the Asian Artistry set (current Level 2 Hostess Set) randomly across the front of my would-be card. Lastly, I used my 3/4" circle punch to create my "signature" eyes (remember my Frankie card? - look here).
For the letters, I ran a piece of Real Red cardstock through my Big Shot and for the first time (it's been collecting dust...) I used my SU Naturally Serif Alphabet die to create the letters. You betcha I had so much fun making this card!
Thanks for peeking!
Stamp: Asian Artistry
Ink: Kiwi Kiss ink, Basic Black marker
Paper: Cardstock in Sahara Sand, Summer Sun, Real Red, Kiwi Kiss, Melon Mambo, Rust, Tempting Turquoise, So Saffron, Whisper White and Basic Black; glitter cardstock from Marcella K.
Accessories: SU Big Shot; Naturally Serif Alphabet Die; 1 3/8", 1", 3/4" circle punches; small heart punch; crystal effects used as adhesive.
Thursday, February 4, 2010
Caterpillar Card
Tuesday, February 2, 2010
Ghirardelli Boxes

Isn't this so cute? Inside this box were three Ghirardelli chocolate squares.

So I took along my box to my medical appointment and ate of those yummy squares... lol. Well this morning BEFORE I left for my blood transfusion, I decided to make one of these boxes to cheer me up! I used the retired Good Morning DSP and Pacific Point cardstocks - something bright and colorful - and here's how it turned out:


Tuesday, January 26, 2010
Mojo Monday 123


Oh wait, you have to check out what's inside my tin! Yummy Hershey minis - and the tin fit 12 pieces. I also used Sending Love DSP for these babies.


Thursday, January 21, 2010
Valentine Fancy Favor Boxes
Hi there! I had two pieces of red cardstock ran through the Big Shot and the Fancy Favor die - from Christmas... a few weeks ago! It had been laying around on my table - can you imagine that? Was not too sure how I would decorate the box, and now here we are in January. I took out my Sending Love DSP, took out some punches, borrowed my neighbor's "Love You Much" set, and this is what I came up with:
Stamp: Love You Much
Ink: Real Red
Paper: Cardstock in Real Red, Choco Chip, Whisper White; Sending Love DSP; glitter paper from Marcella K
Accessories: SU Scallop circle punch, 1 3/8" circle punch, 1 1/4" circle punch, small heart punch; Big Shot, Fancy Favor Die. pink square brads, red satin ribbon.
Below is my second version. This time I trimmed off the edge and placed a white cardstock using the Scallop Trim Edge punch. I punched a hole using my 1 3/4" circle punch and adhered a Sweet Treat cup - made it look like a bay window. I then punched out "Happy Valentine's Day" using my Modern Label punch and adhered it at the bottom. My fancy favor box looked mighty dainty, don't you think so?

Monday, January 18, 2010
Valentine Love Train
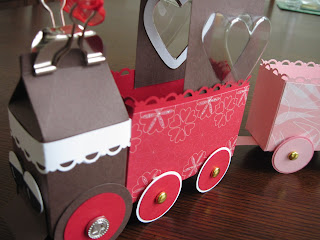
Hi there! I bought this awesome Love Express tutorial from SU demo Gretchen Barron last week and I could not wait to try it! With this tutorial, I did not have to reinvent the wheel! So much easier! Also, Gretchen's tutorial provided alternatives in case you do not have the box and milk carton dies. Lucky for me, I have the milk carton die. And I must say, my train came out absolutely splendid! It was so much fun making it! My two younger children were so astounded to see the final product - their eyes popped out to see a cardstock train! And each child wanted his or her own train with their preferred colors! Hahaha.
I changed a few things though. I used my new Scallop Trim Edge punch, instead of the Heart Trim punch because that is what I have. I also punched out the eyes instead of using the epoxy brads. Lastly I used a big silver binder clip and attached sheer ribbons on the clip handles. I might add my daughter's name using SU's alphabet dies. :) My finished train is approximately 22 inches long..... Can't wait to fill this train up with goodies!


Friday, January 15, 2010
Valentine M&Ms
Hello there! After taking a long break from blogging, I am back.
I am getting ready for Valentine's Day by making V cards and treats. I chanced upon this post and thought - THIS is the perfect inexpensive but CLASSY way of giving out treats this year. You know how as a mom, you get conscious of how much you will need to spend for treats for your child's class. Then what if you have three kids? Ugh do the math! and it's not a pretty picture.
So with my friend Kay, we loaded up pink, purple and white M&Ms into these small clear bags and attached tags on them! Voila! Aren't they just darling? You betcha my kids will be popular this Valentine's Day! Hihihi...
Each finished piece measured approximately 6 inches long. There are 20 pieces of M&Ms in each bag.
I put them on my clear Starbucks mug....for display on the table! Lovely centerpiece huh?
Supplies used:
Stamp: Happy Hearts Day
Ink: chocolate chip
Paper: Melon Mambo, Pretty in Pink, Whisper White, Elegant Eggplant
Accessories: SU large and small tag punch, clear plastic bags, ribbons from Michaels.
Thanks for looking!
Wednesday, November 18, 2009
Jolly Santa
Hello there! Whenever I heard the word J-O-L-L-Y, I always thought of Santa Claus! So when I saw this really cute Santa from this blog, I just had to CASE it. LOL. And since I had that glitter paper from Marcella K that I've used a couple of times for my ornaments, I thought that same glitter paper (in red!) would look great as Santa's hat! I simply punched out a 1 1/4" square, cut it half, used the first half as Santa's top hat, and a portion of the second half with the pom-pom. Easy peasy!
I had been in a red-and-green mode for Christmas cards. So I knew my Santa had to come with the red striped pattern from SU's Merry Moments DSP. The beautiful red ribbon is from Michael's. And the sentiment is from SU's "Jolliest Time of the Year".
Stamp: Jolliest Time of the Year
Ink: Basic Black
Paper: Real Red, Whisper White, Basic Black, Blush Blossom, Pretty in Pink cardstock; Merry Moments DSP; glitter cardstock from Marcella K
Accessories: red ribbon from Michaels; SU 1 1/4" square punch, scallop circle punch, 1 3/8" circle punch, 1/4" circle punch, crystal effects (used as glue).
Thanks for looking!


