Wednesday, February 10, 2010

Easter Milk Carton Treats

Hi there! I was on a roll last night making milk carton treats for my 8 year old daughter's Valentine treats. And lookie here, I made some for Easter too. Lol. I was trying to get a head start, y'know. Anyway, the colors I used are Bashful Blue, Pretty in Pink, Almost Amethyst, and Barely Banana. I took out my "A Good Egg" set from last year, stamped the chick on Whisper White and cut it out. I sponged the upper half of the chick with So Saffron ink and for the bottom half, I stamped another image of the chick onto a DSP I liked and then cut that portion out. So I had *like* a little "dressy" bottom for the chick. The tip of the chick's nose is colored in with Pumpkie Pie marker.


The sentiment "Happy Easter" comes from the same set and is punched out using the Word Window punch. Don't you just love it? I plan to fill these containers with those pastel-colored egg-shaped chocolates around Easter time...


Thanks for dropping by!
Stamp: A Good Egg
Ink: chocolate chip
Paper: cardstock in whisper white, bashful blue, pretty in pink, almost amethyst, barely banana; DSPs - Sending Love, Bashful Blue and Tea Party
Accessories: Big Shot, Milk Carton Die, Word Window punch, non-SU mini binder clips and non SU ribbon.

Tuesday, February 9, 2010

Birthday Favor Boxes

Hi there! My cute little niece turned two and last Sunday, we had a birthday party for her (yep, just in time for SuperBowl Sunday). Using my SU Fancy Favor Die, I made 20 of these and put her picture with those scallop tags. Since purple was my niece's favorite color, I mixed up Elegant Eggplant with Almost Amethyst. I also used Pretty in Pink, Old Olive and So Saffron - colors that went very well with the Tea Party DSPs.


Inside the favor boxes were cello bags of CHEETOS! Lol. Why Cheetos? Well... according to my sister-in-law, Cheetos are my niece's favorite snack! So what better way to share those Cheetos?

Thanks for looking!
Stamps: none
Ink: none
Paper: Tea Party DSP; cardstock in Pretty in Pink, Almost Amethyst, Elegant Eggplant, Tempting Turquiose, So Saffron; scallop circle punch, 1 3/8" and 1 1/4" punches; non-SU brads.

Thursday, February 4, 2010

Caterpillar Card

Hi there! When I saw this card, I knew I had to CASE it! lol. Who can resist such a cute looking caterpillar? I changed several things though. I did not use a slider card. Instead I used a base cardstock of 4" x 12" and scored it at 4" and 8" so that when folded, it is a 4"x4" card. I did not have a 12" x 12" Whisper White cardstock so I settled with the retired Sahara Sand color. I stamped the "grass" image from the Asian Artistry set (current Level 2 Hostess Set) randomly across the front of my would-be card. Lastly, I used my 3/4" circle punch to create my "signature" eyes (remember my Frankie card? - look here).


For the letters, I ran a piece of Real Red cardstock through my Big Shot and for the first time (it's been collecting dust...) I used my SU Naturally Serif Alphabet die to create the letters. You betcha I had so much fun making this card!


Thanks for peeking!


Stamp: Asian Artistry
Ink: Kiwi Kiss ink, Basic Black marker
Paper: Cardstock in Sahara Sand, Summer Sun, Real Red, Kiwi Kiss, Melon Mambo, Rust, Tempting Turquoise, So Saffron, Whisper White and Basic Black; glitter cardstock from Marcella K.
Accessories: SU Big Shot; Naturally Serif Alphabet Die; 1 3/8", 1", 3/4" circle punches; small heart punch; crystal effects used as adhesive.


Tuesday, February 2, 2010

Ghirardelli Boxes

Hi there! I had to go through an IV iron infusion (first of eight, ugh!) yesterday and my friend Kay dropped by and surprised me with this:


Isn't this so cute? Inside this box were three Ghirardelli chocolate squares.


So I took along my box to my medical appointment and ate of those yummy squares... lol. Well this morning BEFORE I left for my blood transfusion, I decided to make one of these boxes to cheer me up! I used the retired Good Morning DSP and Pacific Point cardstocks - something bright and colorful - and here's how it turned out:

I also made another box using the Tea Party DSP series - I'll post the pic tomorrow. Gotta get some rest coz tomorrow's another blood transfusion day.
Thanks for stopping by!

Tuesday, January 26, 2010

Mojo Monday 123


Hi there! It's been awhile since I did a Mojo Monday sketch... and last time I did (back in November) my card was selected as one of the 21 finalists... woohoo! Anyway, I was working on altering this SU skinny tin when I saw the sketch this week. I thought, hey that works!

Here is my altered skinny tin:


I stayed with the red-and-white theme for Valentine. The flower is made of tissue (yep! tissue!) and I got the idea from Patti Lee's blog here. I only have the scallop circle punch so I used that for my flower, sponged the edges in real red ink, and "roughed"up the flower a bit. LOL. The instructions for using the scallop corner punch alongside the scallop trim border punch can be found in Gretchen Barron's blog here. And if you noticed I used a lot of punches - from the corner punch, to the scallop oval and wide oval punches, to the scallop trim and corner punches.

Oh wait, you have to check out what's inside my tin! Yummy Hershey minis - and the tin fit 12 pieces. I also used Sending Love DSP for these babies.


Stamp: Oval All

Ink: Real Red

Paper: Real Red, WHisper White; Sending Love DSP

Accessories: SU Big Shot, Perfect Polka Dots embossing folder, SU skinny tin, scallop corner an trim border punch, 1/2" circle punch, scallop circle punch, scallop oval and wide oval punches, scallop corner and trim border punch, heart-to-heart punch; glitter red cardstock from Marcella K.


Thanks for looking!


Thursday, January 21, 2010

Valentine Fancy Favor Boxes

Hi there! I had two pieces of red cardstock ran through the Big Shot and the Fancy Favor die - from Christmas... a few weeks ago! It had been laying around on my table - can you imagine that? Was not too sure how I would decorate the box, and now here we are in January. I took out my Sending Love DSP, took out some punches, borrowed my neighbor's "Love You Much" set, and this is what I came up with:


Stamp: Love You Much
Ink: Real Red
Paper: Cardstock in Real Red, Choco Chip, Whisper White; Sending Love DSP; glitter paper from Marcella K
Accessories: SU Scallop circle punch, 1 3/8" circle punch, 1 1/4" circle punch, small heart punch; Big Shot, Fancy Favor Die. pink square brads, red satin ribbon.

Below is my second version. This time I trimmed off the edge and placed a white cardstock using the Scallop Trim Edge punch. I punched a hole using my 1 3/4" circle punch and adhered a Sweet Treat cup - made it look like a bay window. I then punched out "Happy Valentine's Day" using my Modern Label punch and adhered it at the bottom. My fancy favor box looked mighty dainty, don't you think so?


Stamp: Holidays and Wishes
Ink: Choco Chip
Paper: Cardstock in Real Red, Whisper White; Sending Love DSP
Accessories: Scallop Trim Edge punch, modern label punch; Sweet Treat cup; Big Shot and Fancy Favor Die.
I can't decide which one I like better.... Hmmmm, maybe I will just fill it up with goodies and sweet treats and see who grabs 'em!
Thanks for looking!

Monday, January 18, 2010

Valentine Love Train

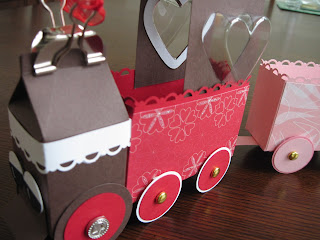
Hi there! I bought this awesome Love Express tutorial from SU demo Gretchen Barron last week and I could not wait to try it! With this tutorial, I did not have to reinvent the wheel! So much easier! Also, Gretchen's tutorial provided alternatives in case you do not have the box and milk carton dies. Lucky for me, I have the milk carton die. And I must say, my train came out absolutely splendid! It was so much fun making it! My two younger children were so astounded to see the final product - their eyes popped out to see a cardstock train! And each child wanted his or her own train with their preferred colors! Hahaha.

I changed a few things though. I used my new Scallop Trim Edge punch, instead of the Heart Trim punch because that is what I have. I also punched out the eyes instead of using the epoxy brads. Lastly I used a big silver binder clip and attached sheer ribbons on the clip handles. I might add my daughter's name using SU's alphabet dies. :) My finished train is approximately 22 inches long..... Can't wait to fill this train up with goodies!


Stamp: none (unbelievable)
Ink: none
Paper: Cardstock in real red, pretty in pink, choco chip, pink pirouette, basic black, whisper white; Sending Love DSP
Accessories: gold brads, Big Shot, milk carton die, Heart treat cups, modern label punch, different SU round punches, crystal effects, large tab punch, scallop trim edge punch, sheer polka dot ribbon from Michaels.
Thanks for looking!


Blog Widget by LinkWithin